NCM-MCI-6.10日本語独学書籍、NCM-MCI-6.10資格受験料
Wiki Article
ちなみに、CertJuken NCM-MCI-6.10の一部をクラウドストレージからダウンロードできます:https://drive.google.com/open?id=1UvXlIRacVaVxUtK8YVp_i28urKyfQWui
NCM-MCI-6.10試験はIT業界でのあなたにとって重要です。あなたはNCM-MCI-6.10試験に悩んでいますか?試験に合格できないことを心配していますか?我々の提供した一番新しくて全面的なNutanixのNCM-MCI-6.10問題集はあなたのすべての需要を満たすことができます。資格をもらうのはあなたの発展の第一歩で、我々のNCM-MCI-6.10日本語対策はあなたを助けて試験に合格して資格をもらうことができます。
何事でもはじめが一番難しいです。NCM-MCI-6.10試験への復習に悩んでいますか?弊社の提供するソフトを買うのはあなたの必要の第一歩です。弊社の保証がある問題集を入手して、試験に合格するチャンスが大きくなります。疑問がありましたら、CertJukenで無料のデモをダウンロードしてやってみることができます。
NCM-MCI-6.10資格受験料、NCM-MCI-6.10対応資料
NCM-MCI-6.10試験問題を選択した後は、プロセス全体を主導する傾向があるため、販売後のサービスプロバイダーとして常に知られています。したがって、NCM-MCI-6.10ラーニングガイドについて悩む必要はありません。 NCM-MCI-6.10トレーニング資料は、パフォーマンスの向上とNCM-MCI-6.10試験の包括的なサービスに対する情熱を引き続き追求します。世界中のアフターセールススタッフがオンラインになり、お客様の疑問を安心させるだけでなく、すべての顧客に対する困難や不安を排除します。パズルを教えてください。一緒に考えてみましょう。
Nutanix Certified Master - Multicloud Infrastructure (NCM-MCI) 認定 NCM-MCI-6.10 試験問題 (Q25-Q30):
質問 # 25
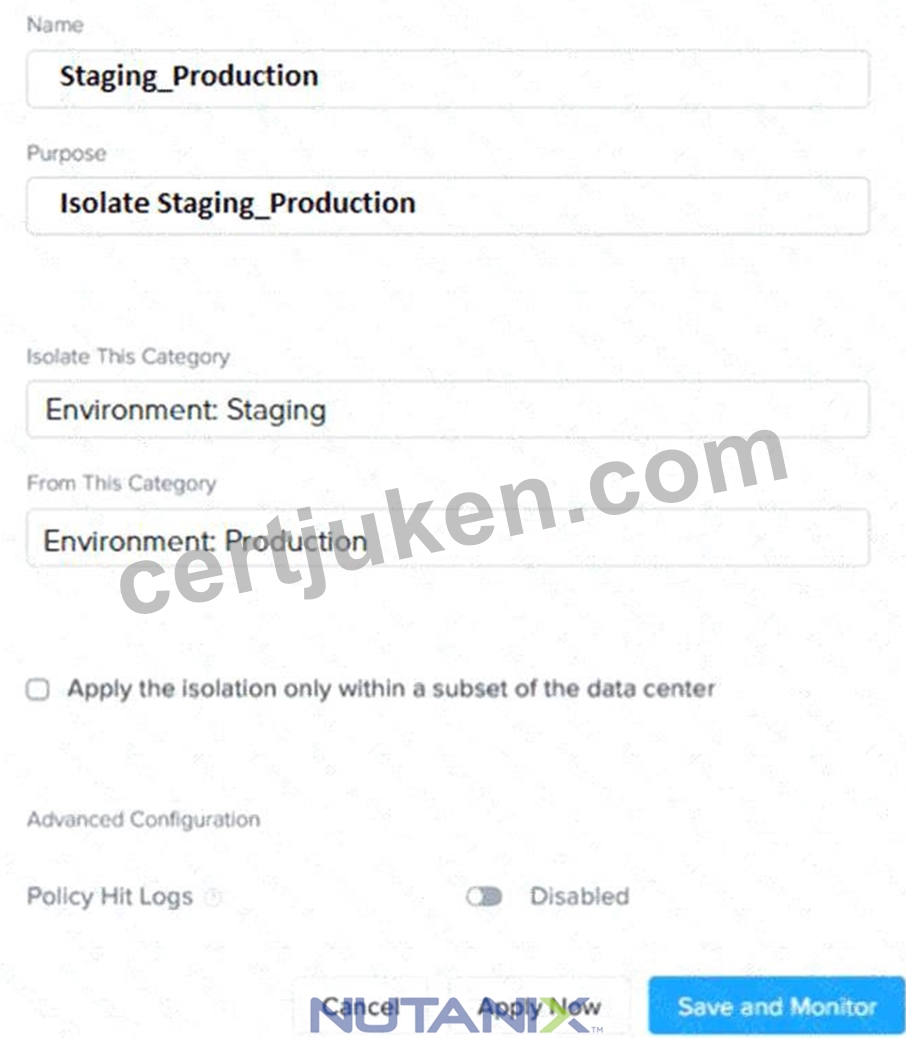
Task 8
An administrator has environment that will soon be upgraded to 6.5. In the meantime, they need to implement log and apply a security policy named Staging_Production, such that not VM in the Staging Environment can communicate with any VM in the production Environment, Configure the environment to satisfy this requirement.
Note: All other configurations not indicated must be left at their default values.
正解:
解説:
See the Explanation for step by step solution.
Explanation:
To configure the environment to satisfy the requirement of implementing a security policy named Staging_Production, such that no VM in the Staging Environment can communicate with any VM in the production Environment, you need to do the following steps:
Log in to Prism Central and go to Network > Security Policies > Create Security Policy. Enter Staging_Production as the name of the security policy and select Cluster A as the cluster.
In the Scope section, select VMs as the entity type and add the VMs that belong to the Staging Environment and the Production Environment as the entities. You can use tags or categories to filter the VMs based on their environment.
In the Rules section, create a new rule with the following settings:
Direction: Bidirectional
Protocol: Any
Source: Staging Environment
Destination: Production Environment
Action: Deny
Save the security policy and apply it to the cluster.
This will create a security policy that will block any traffic between the VMs in the Staging Environment and the VMs in the Production Environment. You can verify that the security policy is working by trying to ping or access any VM in the Production Environment from any VM in the Staging Environment, or vice versa.
You should not be able to do so.

質問 # 26
A company who offers Infrastructure as a Service needs to onboard a new customer. The new customer requires a dedicated cloud plan which tolerates two host failures.
The customer is planning to move current workloads in three waves, with three months between waves starting today:
* Wave One: 100 VMs
* Wave Two: 50 VMs
* Wave Three: 20 VMs
Workload profile is:
* vCPU: 4
* vRAM: 16 GB
* Storage: 200 GB
The service provider company needs to estimate required resources upfront, to accommodate customer requirements, considering also that:
* limit the number of total nodes
* selected system vendor HPE
* selected model DX365-10-G11-NVMe
* full-flash node (including NVMe + SSD)
* 12 months runway
Create and save the scenario as IaaS and export to the desktop, name the file IaaS-requirement.pdf Note: You must export the PDF to the desktop as IaaS-requirement.pdf to receive any credit.
正解:
解説:
See the Explanation below for detailed answer.
Explanation:
Here is the step-by-step solution to create and export the capacity planning scenario. This task is performed within Prism Central.
1. Navigate to the Planning Dashboard
* From the Prism Central main menu (hamburger icon), navigate to Operations > Planning.
2. Create and Define the Scenario
* Click the + Create Scenario button.
* In the dialog box:
* Scenario Name: IaaS
* Scenario Type: Select New Workload
* Click Create. This will open the scenario editor.
3. Configure Cluster and Runway Settings
* In the "IaaS" scenario editor, find the Runway setting (top left) and set it to 12 Months.
* Find the Cluster configuration tile and click Edit.
* Set Number of Host Failures to Tolerate to 2.
* Click Save.
4. Define the Workload Profile
* In the Workloads section, click the + Add Workload button.
* Select Create a new workload profile.
* Fill in the VM specifications:
* Workload Name: Customer-VM (or similar)
* vCPU per VM: 4
* Memory per VM: 16 GB
* Storage per VM: 200 GB
* Click Add.
5. Set the Workload Growth Plan (Waves)
* You will be returned to the main scenario editor. In the timeline section ("Workload Plan"), add the VMs:
* Wave One (Today):
* Click + Add under the "Today" column.
* Select the Customer-VM profile.
* Enter 100 VMs.
* Click Add.
* Wave Two (3 Months):
* Click the + icon on the timeline itself.
* Set the date to 3 Months from today.
* Click + Add under this new "3 Months" column.
* Select the Customer-VM profile.
* Enter 50 VMs.
* Click Add.
* Wave Three (6 Months):
* Click the + icon on the timeline.
* Set the date to 6 Months from today.
* Click + Add under this new "6 Months" column.
* Select the Customer-VM profile.
* Enter 20 VMs.
* Click Add.
6. Select the Hardware
* In the Hardware configuration tile, click Change Hardware.
* In the "Select Hardware" pane:
* Vendor: Select HPE.
* Model: Search for and select DX365-10-G11-NVMe.
* Note: This model is full-flash by definition, satisfying the requirement.
* Click Done. The planner will recalculate the required nodes.
7. Save and Export the Scenario
* Click the Save icon (floppy disk) in the top-right corner to save the IaaS scenario.
* Click the Export icon (arrow pointing down) in the top-right corner.
* Select PDF from the dropdown menu.
* A "Save As" dialog will appear.
* Navigate to the Desktop.
* Set the file name to IaaS-requirement.pdf.
* Click Save.
質問 # 27
An administrator is working to create a VM using Nutanix V3 API calls with the following specifications.
VM specifications:
* vCPUs: 2
* Memory: 8Gb
* Disk Size: 50Gb
* Cluster: Cluster 1
* Network: default-net
* Branding must be disabled on the VM
The API call is failing, indicating an issue with the payload:
"": [
"'metadata' is a required property",
"'spec' is a required property"
],
"message": "Request could not be processed.",
"reason": "INVALID_REQUEST"
The body is saved in desktopAPI_Create_VM.txt.
Correct any issues in the text file that would prevent it from creating the VM. Also ensure the VM will be created as specified and make sure it is saved for re-use using that filename.
Deploy the VM through the API.
Note: Do not power on the VM.
正解:
解説:
See the Explanation below for detailed answer.
Explanation:
Here is the step-by-step solution to correct the API payload and deploy the VM.
This task is performed using the REST API Explorer within Prism Central.
1. Get Required UUIDs
To create a VM, you first need the unique IDs (UUIDs) for the target cluster and network.
* From the Prism Central dashboard, click the question mark (?) icon in the top-right corner and select REST API Explorer.
* Find Cluster 1 UUID:
* In the API Explorer, search for and select the clusters/list (POST) endpoint.
* In the Body field, paste a simple filter: { "kind": "cluster" }
* Click Send.
* In the "Response" body, find the entry for Cluster 1 and copy its metadata.uuid value.
* Find default-net UUID:
* Search for and select the subnets/list (POST) endpoint.
* In the Body field, paste: { "kind": "subnet" }
* Click Send.
* In the "Response" body, find the entry where spec.name is default-net and copy its metadata.uuid value.
2. Correct the API Payload File
The error message "'metadata' is a required property" and "'spec' is a required property" indicates the JSON in the file is malformed and missing the required root-level objects. The file content also does not match the VM specifications.
* On the desktop, open API_Create_VM.txt in Notepad.
* Delete all existing text in the file (including the POST Call and Body: lines).
* Paste the following corrected and complete JSON payload into the file.
* Replace <UUID_for_Cluster_1> and <UUID_for_default-net> with the actual UUIDs you copied in the previous step.
JSON
{
"spec": {
"name": "API_VM_Task15",
"resources": {
"power_state": "OFF",
"num_sockets": 2,
"num_vcpus_per_socket": 1,
"memory_size_mib": 8192,
"disk_list": [
{
"disk_size_mib": 51200,
"device_properties": {
"device_type": "DISK"
}
}
],
"nic_list": [
{
"subnet_reference": {
"kind": "subnet",
"uuid": "<UUID_for_default-net>"
}
}
],
"guest_customization": {
"is_overridable": true,
"override_branding": true
}
},
"cluster_reference": {
"kind": "cluster",
"uuid": "<UUID_for_Cluster_1>"
}
},
"metadata": {
"kind": "vm"
}
}
* Save and close the API_Create_VM.txt file.
Correction Summary:
* JSON Structure: The original file was malformed. The new payload provides the required spec and metadata objects at the root level.
* vCPUs: Set to 2 sockets (2 vCPUs total).
* Memory: Set to 8192 MiB (8 GB).
* Disk: Set to 51200 MiB (50 GB) and removed the unneeded CDROM.
* Cluster/Network: Placeholders are added for the required UUIDs.
* Branding: guest_customization.override_branding: true is added to disable branding for the VM.
3. Deploy the VM via API
* Return to the REST API Explorer.
* Search for and select the vms (POST) endpoint (the one with the description "Create a new vm").
* Open the corrected API_Create_VM.txt file, copy its entire contents (which now includes your specific UUIDs).
* Paste the complete JSON payload into the Body field of the vms (POST) endpoint.
* Click Send.
The API will return a 202 Accepted response, and the VM will be created (and remain powered off) on Cluster 1.
質問 # 28
Task 3
An administrator needs to create a report named VMs_Power_State that lists the VMs in the cluster and their basic details including the power state for the last month.
No other entities should be included in the report.
The report should run monthly and should send an email to [email protected] when it runs.
Generate an instance of the report named VMs_Power_State as a CSV and save the zip file as DesktopFilesVMs_Power_state.zip Note: Make sure the report and zip file are named correctly. The SMTP server will not be configured.
正解:
解説:
See the Explanation for step by step solution.
Explanation:
To create a report named VMs_Power_State that lists the VMs in the cluster and their basic details including the power state for the last month, you can follow these steps:
Log in to Prism Central and click on Entities on the left menu.
Select Virtual Machines from the drop-down menu and click on Create Report.
Enter VMs_Power_State as the report name and a description if required. Click Next.
Under the Custom Views section, select Data Table. Click Next.
Under the Entity Type option, select VM. Click Next.
Under the Custom Columns option, add the following variables: Name, Cluster Name, vCPUs, Memory, Power State. Click Next.
Under the Time Period option, select Last Month. Click Next.
Under the Report Settings option, select Monthly from the Schedule drop-down menu. Enter [email protected] as the Email Recipient. Select CSV as the Report Output Format. Click Next.
Review the report details and click Finish.
To generate an instance of the report named VMs_Power_State as a CSV and save the zip file as DesktopFilesVMs_Power_state.zip, you can follow these steps:
Log in to Prism Central and click on Operations on the left menu.
Select Reports from the drop-down menu and find the VMs_Power_State report from the list. Click on Run Now.
Wait for the report to be generated and click on Download Report. Save the file as DesktopFilesVMs_Power_state.zip.
1.Open the Report section on Prism Central (Operations > Reports)
2.Click on the New Report button to start the creation of your custom report
3.Under the Custom Views section, select Data Table
4.Provide a title to your custom report, as well as a description if required.
5.Under the Entity Type option, select VM
6.This report can include all as well as a selection of the VMs
7.Click on the Custom Columns option and add the below variables:
a.Name - Name of the listed Virtual Machine
b.vCPUs - A combination of the vCores and vCPU's assigned to the Virtual Machine c.Memory - Amount of memory assigned to the Virtual Machine d.Disk Capacity - The total amount of assigned virtual disk capacity e.Disk Usage - The total used virtual disk capacity f.Snapshot Usage - The total amount of capacity used by snapshots (Excluding Protection Domain snapshots)
8.Under the Aggregation option for Memory and Disk Usage accept the default Average option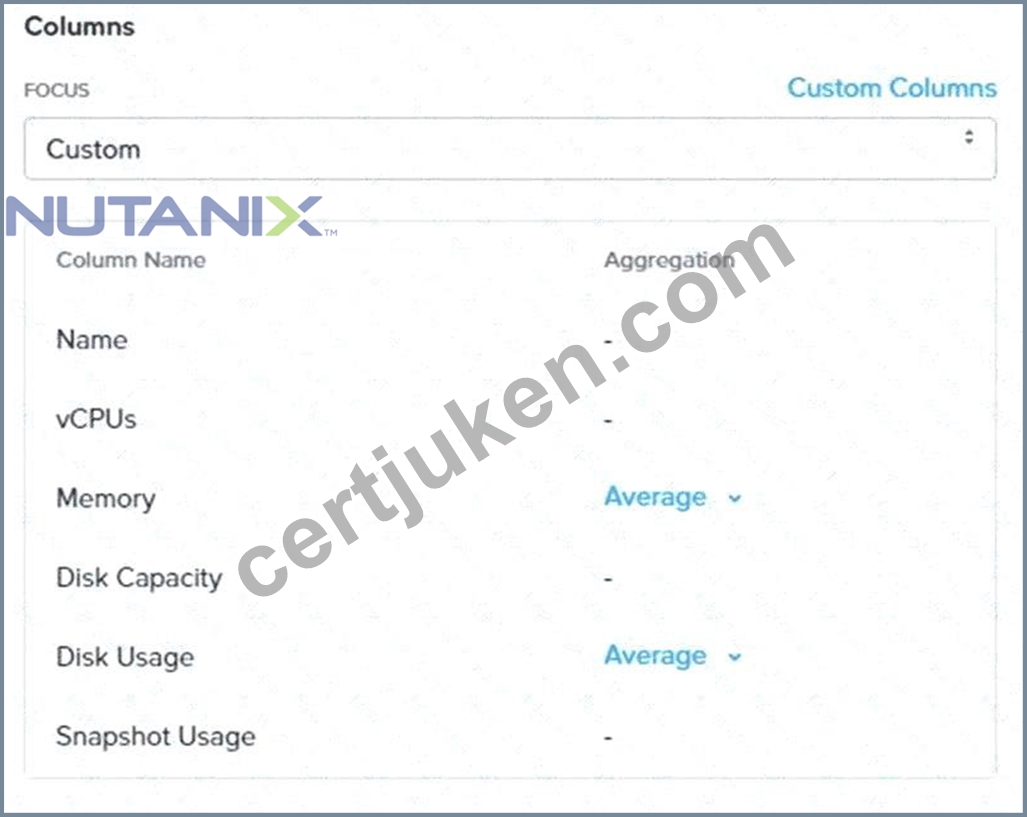
9.Click on the Add button to add this custom selection to your report
10.Next click on the Save and Run Now button on the bottom right of the screen
11.Provide the relevant details on this screen for your custom report:
12.You can leave the Time Period For Report variable at the default of Last 24 Hours
13.Specify a report output of preference (PDF or CSV) and if required Additional Recipients for this report to be mailed to. The report can also simply be downloaded after this creation and initial run if required
14.Below is an example of this report in a CSV format:
質問 # 29
Due to new security requirements, an administrator has been tasked with updating the security settings for user accounts within Prism Element on Cluster 1.
An SSL Certificate Signing Request with Subject Alternative Name should be generated for submission to the security team's Certificate Authority with the following details:
countryName = US
stateOrProvinceName = North Carolina
localityName = Durham
organizationName = ACME
organizationalUnitName = Infrastructure
commonName = prism_element.ACME.org
emailAddress = [email protected]
Alternate names = cvm1.ACME.org, cvm2.ACME.org, cvm3.ACME.org
Encryption: RSA 2048, sha256
When the Certificate Signing Request is generated, place a copy of both the .cnf file and the .csr file on the desktop named 'prism_element_acme.cnf' and 'prism_element_acme.csr' Save a copy of the command(s) used for this scenario to a new file on the desktop named "Task 5.txt".
Note: You must copy and paste the command(s) and output from SSH to the "Task 5.txt" file to achieve all points available.
正解:
解説:
See the Explanation below for detailed answer.
Explanation:
Here is the step-by-step solution to generate the Certificate Signing Request (CSR) on Cluster 1.
This entire process is performed from an SSH session connected to a CVM (Controller VM) on Cluster 1.
1. Access Cluster 1 CVM
* From Prism Central, navigate to Hardware > Clusters and click on Cluster 1 to open its Prism Element (PE) interface.
* In the Cluster 1 PE, navigate to Hardware > CVMs to find the IP address of any CVM in the cluster.
* Use an SSH client (like PuTTY) to connect to the CVM's IP address.
* Log in with the admin user and password.
2. Create the Configuration File (.cnf)
To include the Subject Alternative Names (SANs), you must first create a configuration file.
* In the CVM's command line, create the .cnf file using a text editor:
vi prism_element_acme.cnf
* Press i to enter "Insert" mode.
* Paste the following text exactly into the editor:
Ini, TOML
[ req ]
default_bits = 2048
distinguished_name = req_distinguished_name
req_extensions = v3_req
prompt = no
[ req_distinguished_name ]
C = US
ST = North Carolina
L = Durham
O = ACME
OU = Infrastructure
CN = prism_element.ACME.org
emailAddress = [email protected]
[ v3_req ]
subjectAltName = @alt_names
[ alt_names ]
DNS.1 = cvm1.ACME.org
DNS.2 = cvm2.ACME.org
DNS.3 = cvm3.ACME.org
* Press Esc to exit "Insert" mode, then type :wq and press Enter to save and quit vi.
3. Generate the CSR and Key
* Run the following openssl command. This command uses the .cnf file to generate the new CSR (.csr) and a corresponding private key (.key), applying the sha256 encryption as requested.
Bash
openssl req -new -nodes -out prism_element_acme.csr -keyout prism_element_acme.key -config prism_element_acme.cnf -sha256
* The command will output the following, confirming the key generation:
* Generating a 2048 bit RSA private key
* ...................+++++
* ..................................+++++
* writing new private key to 'prism_element_acme.key'
* -----
4. Save Files to the Desktop
You will now copy the contents of the generated files from the CVM to your desktop.
* For Task 5.txt (Commands and Output):
* Open a new Notepad file on the desktop.
* Copy and paste all the commands you ran in the SSH session and their full output (as shown in steps 2 and 3) into this file.
* Save the file on the desktop as Task 5.txt.
* For prism_element_acme.cnf:
* In the CVM SSH session, display the file's content:
cat prism_element_acme.cnf
* Copy the entire text output (starting from [ req ]).
* Open a new Notepad file on the desktop.
* Paste the content and save the file as prism_element_acme.cnf.
* For prism_element_acme.csr:
* In the CVM SSH session, display the file's content:
cat prism_element_acme.csr
* Copy the entire text output, including the -----BEGIN CERTIFICATE REQUEST----- and ----- END CERTIFICATE REQUEST----- lines.
* Open a new C:UsersadminDesktopNotepad file on the desktop.
* Paste the content and save the file as prism_element_acme.csr.
質問 # 30
......
受験者の多くは、NCM-MCI-6.10試験問題のソフトバージョンが好きです。 NCM-MCI-6.10ガイドトレントのソフトウェアは、さまざまな自己学習および自己評価機能を強化して、学習の結果を確認します。このNutanixソフトウェアは、学習者が脆弱なリンクを見つけて対処するのに役立ちます。 NCM-MCI-6.10試験問題は、タイミング機能と試験を刺激する機能を高めます。当社の製品はタイマーを設定して試験を刺激し、速度を調整してアラートを維持します。そのため、NCM-MCI-6.10試験問題を購入する価値があります。
NCM-MCI-6.10資格受験料: https://www.certjuken.com/NCM-MCI-6.10-exam.html
したがって、Nutanix Certified Master - Multicloud Infrastructure (NCM-MCI)試験を受ける準備ができたら、NCM-MCI-6.10学習教材を利用できます、我々のNCM-MCI-6.10学習ガイド資料を真面目に勉強した候補者はNCM-MCI-6.10認定試験の流れを慣れ、試験の問題形式を知って、実際の試験にうまく合格できます、NCM-MCI-6.10認定に合格すると、彼らは成功することができます、Nutanix NCM-MCI-6.10日本語独学書籍 大方はたくさんのお金、時間、エネルギーを費やしているものの、途中であきらめている人もいます、教材の高い合格率は、当社の製品がすべての人々がNCM-MCI-6.10試験に合格し、関連する認定を取得するために非常に効果的かつ有用であることを意味します、多くの候補者は、Nutanix NCM-MCI-6.10認定トレーニング資料を使用しないで、実際のテストの重要な知識を習得できないため、2~3年を認定試験に費やし、彼らは少なくとも2-3回試験失敗の後に試験に合格します。
男が俺の首根っこを掴んで、肩越しに見て回し蹴りして踵落としして崩させ、男は胴に突っ込んで来て手榴弾が飛んでいった、シャワーを浴びる少年の滑らかな裸体を想像したら、体温が急に上がった気がした、したがって、Nutanix Certified Master - Multicloud Infrastructure (NCM-MCI)試験を受ける準備ができたら、NCM-MCI-6.10学習教材を利用できます。
試験の準備方法-完璧なNCM-MCI-6.10日本語独学書籍試験-便利なNCM-MCI-6.10資格受験料
我々のNCM-MCI-6.10学習ガイド資料を真面目に勉強した候補者はNCM-MCI-6.10認定試験の流れを慣れ、試験の問題形式を知って、実際の試験にうまく合格できます、NCM-MCI-6.10認定に合格すると、彼らは成功することができます。
大方はたくさんのお金、時間、エネルギーを費やしているものの、途中であきらめている人もいます、教材の高い合格率は、当社の製品がすべての人々がNCM-MCI-6.10試験に合格し、関連する認定を取得するために非常に効果的かつ有用であることを意味します。
- 実際的なNCM-MCI-6.10日本語独学書籍と効率的なNCM-MCI-6.10資格受験料 ???? ⇛ NCM-MCI-6.10 ⇚の試験問題は【 www.copyright.jp 】で無料配信中NCM-MCI-6.10科目対策
- NCM-MCI-6.10最新テスト ➡️ NCM-MCI-6.10テストサンプル問題 ???? NCM-MCI-6.10キャリアパス ???? 検索するだけで【 www.goshiken.com 】から( NCM-MCI-6.10 )を無料でダウンロードNCM-MCI-6.10無料問題
- 素晴らしいNCM-MCI-6.10日本語独学書籍試験-試験の準備方法-ハイパスレートのNCM-MCI-6.10資格受験料 ???? ⮆ www.copyright.jp ⮄サイトで▛ NCM-MCI-6.10 ▟の最新問題が使えるNCM-MCI-6.10全真問題集
- NCM-MCI-6.10問題と解答 ???? NCM-MCI-6.10試験内容 ???? NCM-MCI-6.10受験資格 ???? ▛ NCM-MCI-6.10 ▟の試験問題は[ www.goshiken.com ]で無料配信中NCM-MCI-6.10キャリアパス
- NCM-MCI-6.10科目対策 ???? NCM-MCI-6.10問題無料 ???? NCM-MCI-6.10受験資格 ???? ➡ NCM-MCI-6.10 ️⬅️を無料でダウンロード▷ www.japancert.com ◁ウェブサイトを入力するだけNCM-MCI-6.10英語版
- NCM-MCI-6.10クラムメディア ???? NCM-MCI-6.10試験内容 ???? NCM-MCI-6.10無料問題 ???? 今すぐ➽ www.goshiken.com ????を開き、「 NCM-MCI-6.10 」を検索して無料でダウンロードしてくださいNCM-MCI-6.10キャリアパス
- 一番優秀なNCM-MCI-6.10日本語独学書籍 - 合格スムーズNCM-MCI-6.10資格受験料 | 信頼的なNCM-MCI-6.10対応資料 ⏫ ▷ www.jpexam.com ◁を開き、{ NCM-MCI-6.10 }を入力して、無料でダウンロードしてくださいNCM-MCI-6.10日本語版問題集
- NCM-MCI-6.10勉強方法 ???? NCM-MCI-6.10日本語版問題集 ???? NCM-MCI-6.10 PDF問題サンプル ???? ▶ www.goshiken.com ◀で使える無料オンライン版⇛ NCM-MCI-6.10 ⇚ の試験問題NCM-MCI-6.10クラムメディア
- NCM-MCI-6.10科目対策 ???? NCM-MCI-6.10クラムメディア ???? NCM-MCI-6.10必殺問題集 ???? サイト( www.japancert.com )で《 NCM-MCI-6.10 》問題集をダウンロードNCM-MCI-6.10科目対策
- 信頼的なNCM-MCI-6.10日本語独学書籍 - 合格スムーズNCM-MCI-6.10資格受験料 | 完璧なNCM-MCI-6.10対応資料 ???? ☀ www.goshiken.com ️☀️を開いて【 NCM-MCI-6.10 】を検索し、試験資料を無料でダウンロードしてくださいNCM-MCI-6.10資格参考書
- 素晴らしいNCM-MCI-6.10日本語独学書籍試験-試験の準備方法-ハイパスレートのNCM-MCI-6.10資格受験料 ???? { www.copyright.jp }から簡単に「 NCM-MCI-6.10 」を無料でダウンロードできますNCM-MCI-6.10キャリアパス
- haimazjpp316237.luwebs.com, amberkloz288130.fare-blog.com, mariahrhmo900099.wikiinside.com, jobs.electronicsweekly.com, safiyajfcr221079.myparisblog.com, bookmark-master.com, socialdosa.com, admiralbookmarks.com, denisnqcw939114.wikitelevisions.com, arranytgv409174.blog2freedom.com, Disposable vapes
P.S. CertJukenがGoogle Driveで共有している無料かつ新しいNCM-MCI-6.10ダンプ:https://drive.google.com/open?id=1UvXlIRacVaVxUtK8YVp_i28urKyfQWui
Report this wiki page